We’ve posted previously about the enjoyment we’ve found developing skills for the Amazon Echo. No stranger to this agreeable device, after finishing the last assignment we decided it would be cool to build something our Matchbox co-workers could use on a daily basis. After all, everyone is talking about smart homes but what about smart offices?
With this shared ambition we embarked on a project extensive enough to dwarf our previous Alexa-based efforts. To get things started we compiled a small internal team; Megan Rabin (Director of sales), Georgia Edmonds (Producer), Giulio Ladu (Development), and Adam Thoms (Design).
Refining the initial idea
Adam Thoms – After creating a shortlist of Alexa ideas we opened up an office wide vote, honing in on ‘a screen and audio notification system for the Meeting Room’. It struck us as the most practical, efficiency-improving solution to our typical workday in the office.
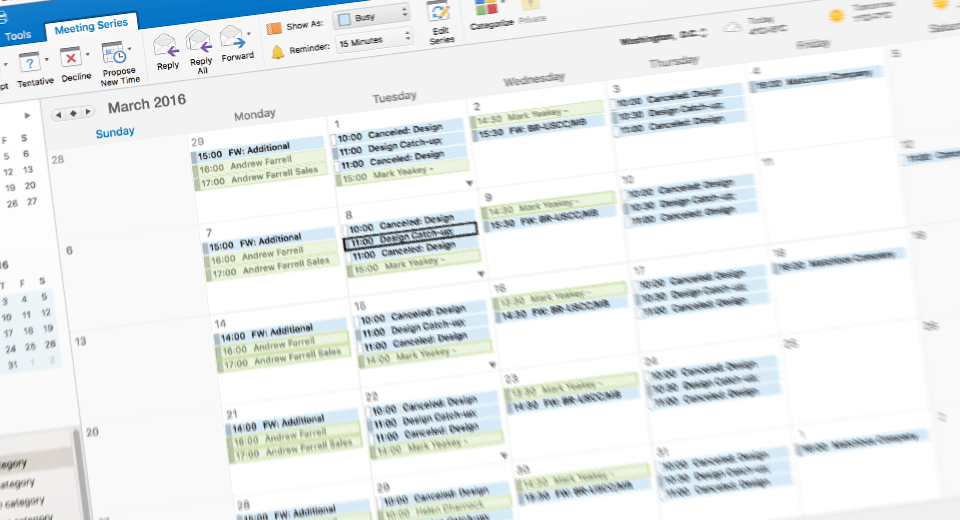
A recurring dialogue you hear around Matchbox HQ is ‘Do you know if the Meeting Room is free?’, which then involves someone launching the shared calendar within Outlook. Or if already inside the Meeting Room, sometimes a little head might poke round the door to see if it’s available, a tad distracting when in the middle of a Skype call.
We envisioned a better approach, not to replace the current PC-based creation and editing of meetings, but to offer a quick, hands-free and easily accessible reference point of information. It also had to be visible, conveying availability in just a glance. So in addition to Alexa’s conversational prowess, we would need some kind of visual display.
Technical Approach
Giulio Ladu – While planning the start of this project, we looked into how Alexa applications (Skills) could be hosted. We found that there are two ways to do this; the first is by creating a Lambda function which can be hosted using Amazon Web Services; the main benefit for doing this is that it is very quick to get a skill up and running, and all certifications and the authorization are handled by the Amazon cloud.
The second option was to host the service ourselves and handle all the interaction and authorization. In our previous projects we used the Amazon services to host our skills, however this time round we wanted to branch out and try something different – because, why not!
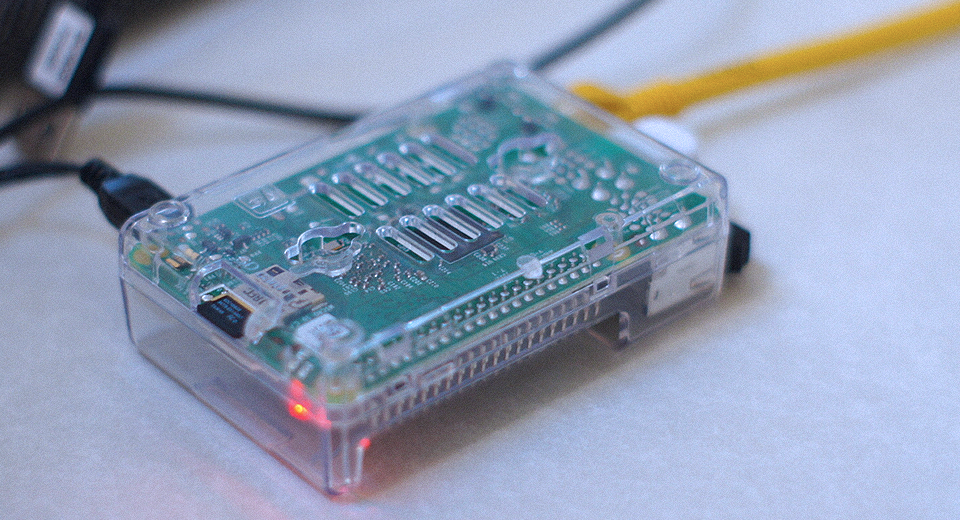
We decided that we would need a web service hosted somewhere which would be able to serve up our data. We knew what data we would be displaying, the final decision was to decide what hardware we wanted to use, and how we wanted to use it. I was keen to try out the office’s shiny new Raspberry Pi 2.
I also wanted an opportunity to check out the new operating system released by Microsoft called Windows 10 IoT core; a scaled down version of an operating system which could be used with our new Raspberry Pi. So with this in mind we set about thinking how this could all fit together.
Thoughts on the end experience
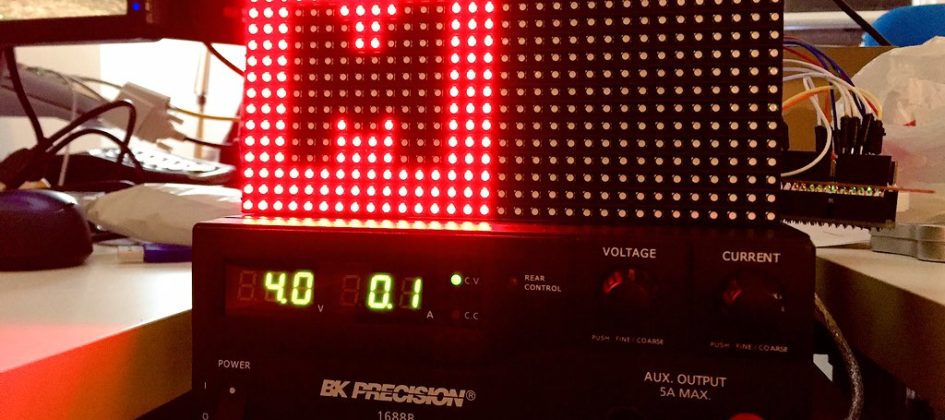
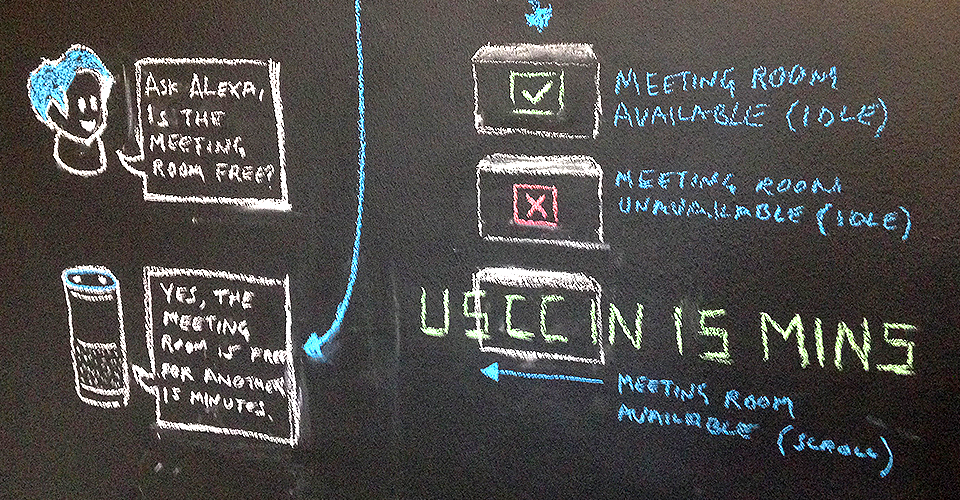
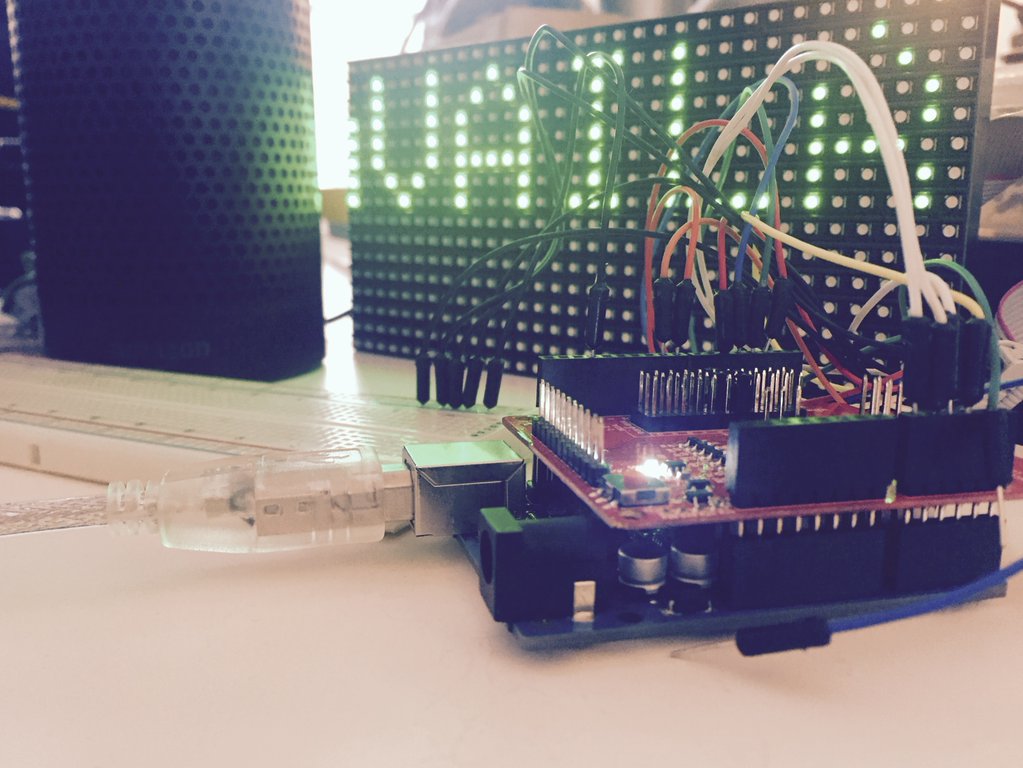
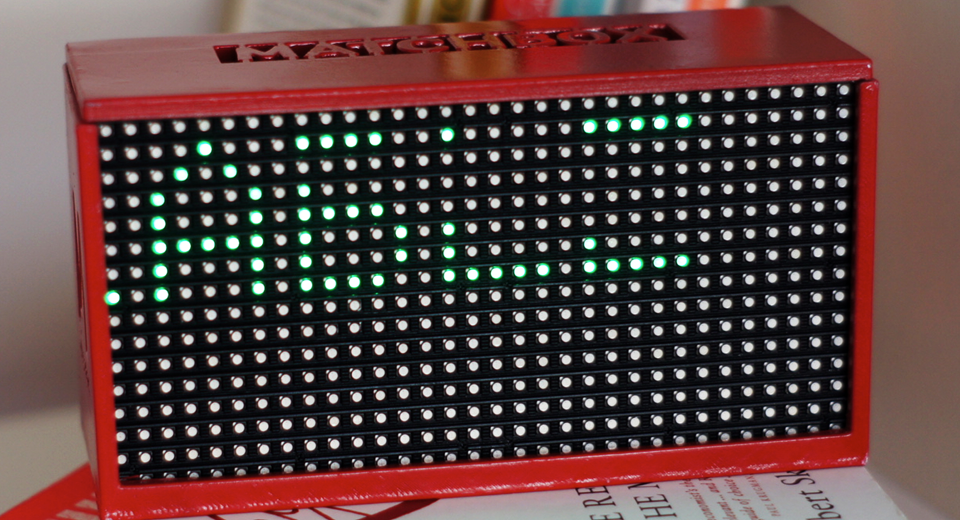
AT – Early on we could see colour would play a big part in communicating the meaning of information. Red and green are quite universally understood as negative (stop) and positive (go). So when it came to choosing an output display for the setup, we selected an LED board.
This gave us the functionality to present data in red (indicating the Meeting Room is unavailable) and green (if it is available).
Laying the foundations
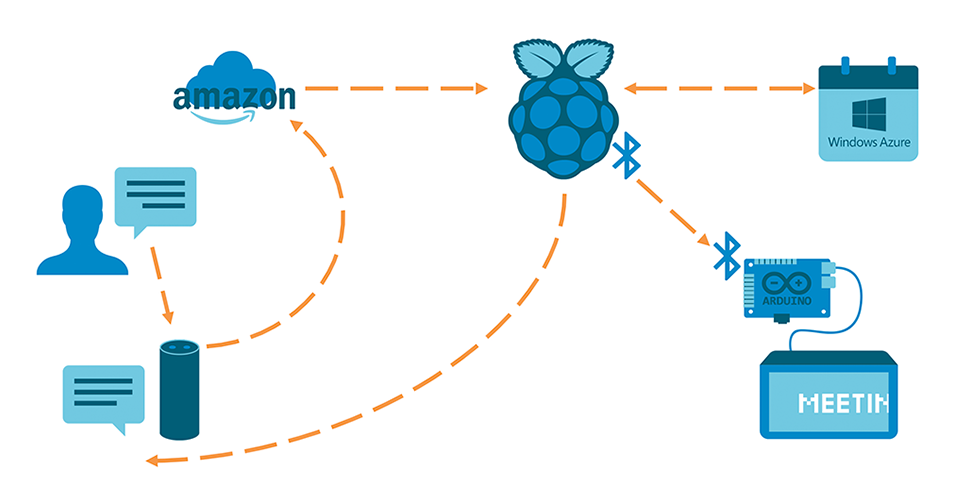
GL – The next step was to load Microsoft IoT core on to the Raspberry Pi to host the new service, which will be called by Alexa. The service will connect to our shared calendars which would pull down and format the relevant data, and construct a response for Alexa to speak. At the same time the service will connect to an Arduino via Bluetooth 4.0 and update an LED Matrix with the current meeting room status.
How should it work?
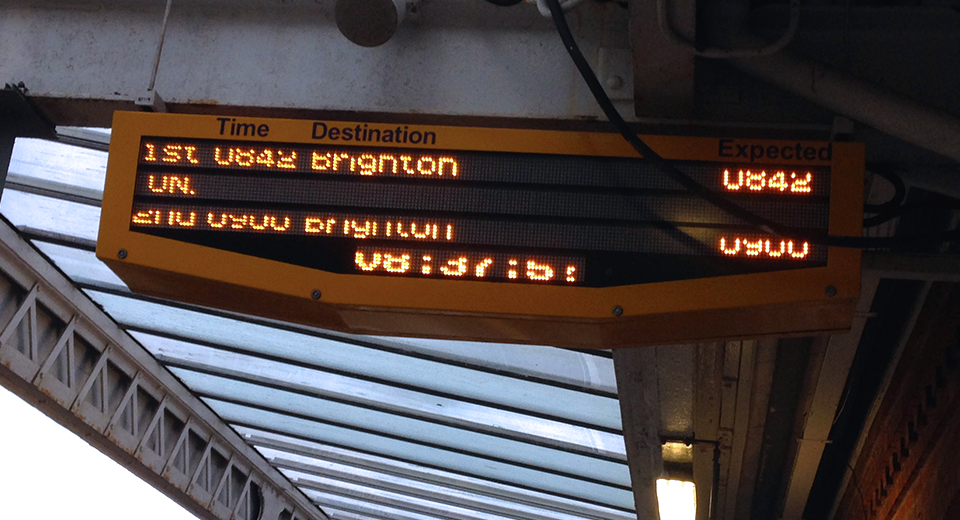
AT – For the LED board, one source of inspiration was train station displays. With the limited space they occupy, but lengthy amount of information they need to present (destination stations, times, delays etc.) they seemed like an applicable subject to research e.g. what techniques do they employ to do this? Typically, the display will hold on the primary information, such as ultimate destination, then beneath (or sometimes on the same line) begin to horizontally scroll through a list of secondary items; in this example, the different stops the train will make.
From here we sketched out how this process could be applied to the information in our Meeting Room calendar. Passing this to Giulio, he was able to start investigating existing scrollable code libraries and report how these would affect the content displayed on the LED board, such as character limits and buffering speeds.
Creating a hosted service for Alexa
GL – I wanted the LED Matrix to be completely portable, and thus decided that the Arduino, with its small power footprint would be ideal. I also liked the idea of using Bluetooth communication as this would minimise the number of cables running out of the device, and would allow it to be hung from the meeting room door.
Hosting a service which Alexa can interact with requires following some strict guidelines, one of which is that all communication needs to be through port 443. This solution would have involved some major configuration issues in our office network, so we had to think of a work around. After further scouring through the Amazon Developer Forums (which is full of extremely helpful people) I came across a post where someone had previously had the same issue. It became apparent that a possible way around this would be to host a pass through Lambda function on the Amazon services. This is a function which packages up the request made by Alexa and passes it to a hardcoded URL to handle and process the data.
Although this wouldn’t be possible to use this approach for a skill which is going to be distributed via the Alexa store, it seemed to be just what we needed. This would allow us to call our own server and still handle data processing, as well obtain information about how Alexa interacts directly with a web service.
Onwards and upwards
We close Part 1 of our Alexa trilogy with a clearly defined project objective; having sketched out initial design considerations and even implemented the fundamental technical components.
With a well-planned synthesis of Raspberry Pi 2, Microsoft IoT core, LED matrix and Amazon Echo, things are starting to take shape for the Matchbox team of Giulio Ladu (Development) and Adam Thoms (Design).
Creating a hosted service for Alexa
Giulio Ladu – First thing to note when looking at hosting anything on Windows IoT core is that there is no IIS (Internet information services), which is somewhat limiting. However Microsoft do provide a solution which shows you how to create your very own server from scratch. I thought this would give me an opportunity to get back to basics; the solution I found was the Microsoft Windows IoT core Blinky Sample. In this sample there are two projects, one acts as the web server and the other acts as the IoT device. Some issues here meant was not the kind of format I needed, however it did provide a great starting point.
Once the basic server code was up and running on the Raspberry Pi, it was time to see if the Amazon passthrough would be able to interact with our server. Receiving that first request from Amazon was a massive relief, and provided a great insight into how everything would interact.
The next step was to create a library which would know how to deal with this request, and in turn format the required response. After much documentation reading and trawling through forums I came across a blog post which explained how to get started with Alexa development using .Net. Within this blog post they discuss a library which had been written to parse the request made by Alexa services and allow you to create a skill using .Net.
After reading through the code I attempted to combine the library with the already implemented server code, however I found that to deploy anything to IoT core it has to make use of the Windows 10 Universal Library. Once the .Net library was integrated into the server, I was able to receive a call from the Alexa services and generate an output using C#.
Bonus!
Connecting Alexa to our custom server running on the Raspberry Pi worked, however there was still one more piece to the puzzle, connecting to the Arduino over Bluetooth. For this I wanted to create a custom BLE (Bluetooth Low Energy) profile that would expose a service which would allow me to send a string value over to the Arduino. Fortunately, this was something which could be designed fairly quickly and easily as members of the Matchbox team have been working closely with Bluetooth over the last few years to create a piece of software called Bluetooth Developer Studio.
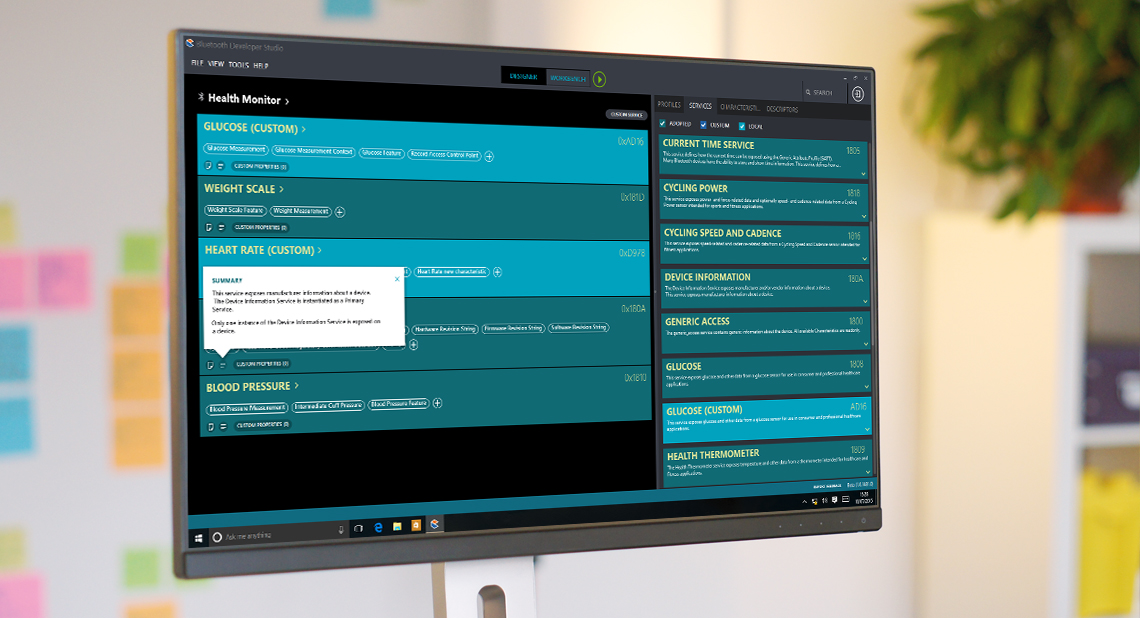
BDS allows you to create a profile and see how it will interact, as well as send and receive data, with a virtual device. After designing the profile in BDS I was able to use a piece of software provided by Nordic Semiconductor to generate the files needed to convert our BLE shield to start broadcasting the correct profile. Once I had the Arduino broadcasting my custom profile I was able to go back to BDS, however instead of testing against a virtual device, I was able to test against my actual Bluetooth device!
A foray into industrial design
Adam Thoms – As our Alexa project developed and evolved; a small mountain of various Arduino parts, Bluetooth adapters, and wires began to accumulate on Giulio’s desk.
Considering our ‘real-world’ approach to this project, it was apparent the impressive yet fragile system he had created wouldn’t last too long when left in the presence of any unsupervised Matchbox rabble. It would need some sort of container, both for protection and so it could be neatly stored by the Meeting Room door.
Step one was to start jotting down the dimensions of Giulio’s hardware setup, noting the spacing each part would require from its neighbours and if any outlets where required, such as power leads or air vents. From here I sketched out a design that could contain the items while also being secured to the wall.
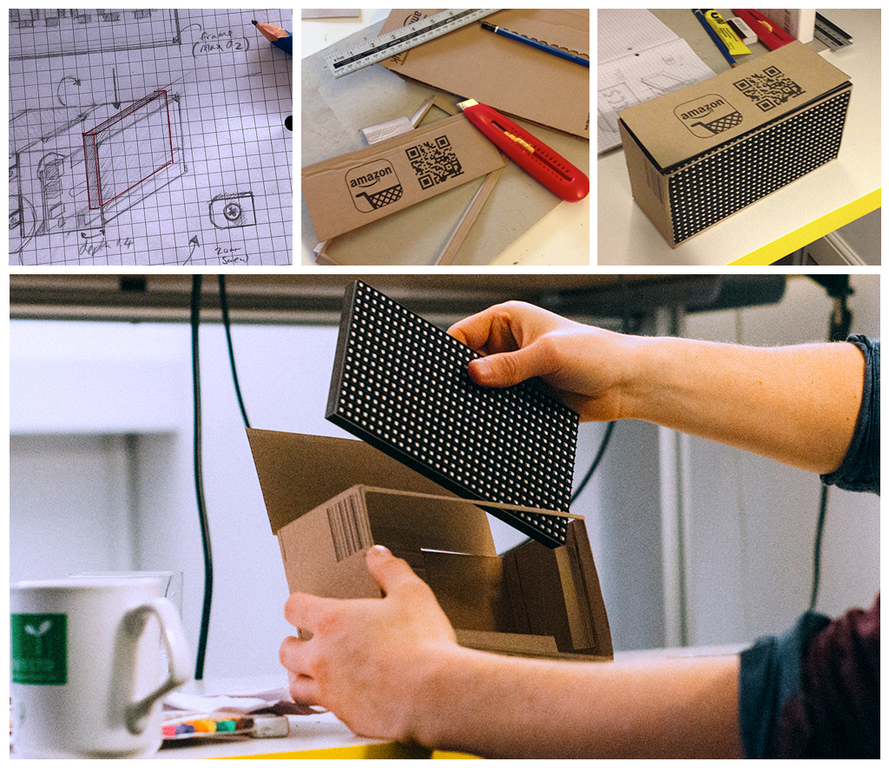
After sharing the initial sketch in our weekly project meeting I set to work creating a prototype. With a cursory glance into the Matchbox Recycling Box I soon found the perfect compartments. Fortunately for me somebody had recently received a large delivery of books, this being an Echo project I couldn’t have wished for a better prototyping material than Amazon branded cardboard.
Progress with Bluetooth connectivity
GL – With the Bluetooth profile working correctly, all I needed to do now was to ensure the Raspberry Pi was connected over Bluetooth to the Arduino. Firstly, it is worth noting that at the time of writing this there are only a limited number of Bluetooth dongles which are supported by IoT core, so I had to be sure to purchase one from the defined list. Thus, with a shiny new supported BLE dongle I went to work creating a universal app “test project” that would allow me to work on the new functionality without affecting my current server code.
Working with Windows IoT core was quite easy in this respect, as I have worked on previous products which use Bluetooth in the past and as the IoT core can run universal applications, it was simply a case of following these steps:
- First we query the operating system to get a list of all connected devices, filtering them on the device name (which had been defined in the creation of the BLE profile).
- Once we have the device (in this case the Arduino) we can query it for available Gatt Services filtering on the service UUID we specified when creating our Profile.
- Finally with the correct service we are able to query the service for available Gatt Characteristics again filtering the results on the UUID we specified when creating the profile.
Once we have the characteristic we are able to write data to the Arduino, which was the final part of the hardware puzzle. After the Bluetooth communications were complete, we were able to Ask Alexa a question, retrieve the data in our web server, format it, and then pass any data through to the Arduino. It was looking good!

Matchbox gets 3D printing
AT – From the perspective of the end user, the LED board is clearly the focus of their attention. This was one of my key concerns when fleshing out the design in three dimensions; as the LED board has no frame (the matrix of diodes begins and ends with a marginal plastic boarder) any part of the supporting container could easily begin to impede on the visibility of the content. The prototype phase allowed us to test how thin we could make this supporting frame while feasibly maintaining enough strength to hold the hardware inside. It also granted us the opportunity to see how each item sat inside the box, illustrating if more or less space would be required in certain areas.
With the prototype built and presented to the rest of the team, the unanswered question we pondered was ‘How do we make this for real?’.
- Should we go down the wood-working route? Slightly archaic for such a cutting edge project.
- Maybe metal? Too heavy duty.
- How about Lego? Tempting but tenuous!
There was only one answer to fit the bill, with Giulio pushing the boundaries of Amazon Echo software development, far be it for the Design team to shy away from emerging technology. Despite a lack of existing CAD/CAM experience we would 3D print our storage container.
Where to start? After some internet research we discovered BuildBrighton. A local community-driven workshop equipped with 3D printers, laser cutters, routers, lathes and pretty much everything else you can think of. Following an introductory email expressing our project to BuildBrighton, Alex kindly responded with information about their open evening, a chance for any interested Joe Public to visit the workshop and talk with existing members.
On a somewhat chilly Thursday in December I eagerly ventured to BuildBrighton HQ, with my cardboard prototype in hand. There I was greeted by Felix, who gave me a tour of the premises, pointing out the wide range of tools and equipment available. After chatting with some other members about what Matchbox was hoping to achieve, I was introduced to Jon. He was able to look at the prototype model and suggest how I should go about 3D printing it.
We now had a plan (with insider knowledge of the Tuesday BuildBrighton 3D Printing night in two weeks’ time) it had three steps:
- Sign up as a BuildBrigton member (they recommended a payment of £20 per month)
- Create a digital 3D model of our container
- Take the model to get printed at the workshop’s 3D Printing night
Office 365 woes
GL – Now we had some dummy data coming into the Arduino, but we still needed a way to access our office’s shared calendar, and retrieve all meetings that were hosted in the Meeting Room that day. We discovered that accessing your own calendar was fairly straight forward, getting a calendar for a room was not so much. It appears that the ease of getting a shared calendar depends on how your Office 365 is set up, and whether you are using Azure active directory. I proved that it was possible by using Outlook COM object in a test project, however this would not work running on the Raspberry Pi as it relies on the device having an instance of Outlook running. So we knew it was possible but we were still trying to find a solution.
EWS (Exchange Web Services) to the rescue! Again, after setting up a test project we were able to start digging around in EWS, hours of trial and error and we managed to get the data we were looking for. Success we thought, however when trying to port our written code over we were hit with another problem. The code could not be hosted on the server, as a lot of the libraries which EWS relies on do not work within a Windows 10 Universal application (which is needed to run on IoT core). This was luckily not a difficult problem to solve as we were able to create a new ASP web API and host it on Azure. After some code formatting and restructuring we now had a web API which could be called from our IoT core server, and receive a JSON file containing a list of all meetings between two dates.
From here on out this would be plain sailing, all we had to do was use the previously created library to issue a speechlet (used to define what Alexa will say, and update the Alexa card) and build a response to return, which would result in Alexa reading out our calendar data. Working with the LED matrix on the other hand would prove to be somewhat problematic.
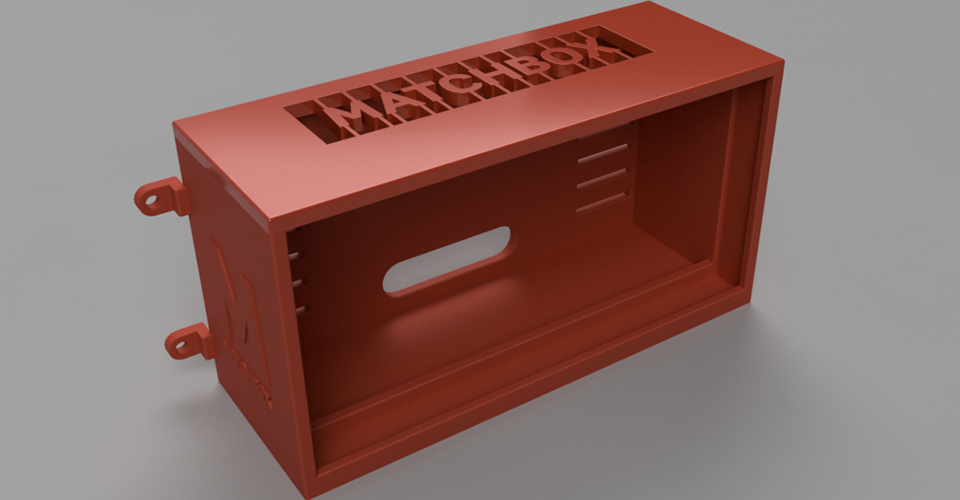
Creating the 3D Model
AT – Having some 3D modelling experience for real-time environments and animation I opened the Autodesk Fusion 360 software that had been recommended to me without complete bewilderment and abhorrence. Still, the Design & Technology lessons of yesteryear felt like a long time ago. After much trial and error, lots of coffee and loss of patience; I arrived at a point where I was happy to call the 3D model complete and ready to attempt printing.
However, all was not to go to plan. As Tuesday night quickly approached, the 3D Printing evening at BuildBrighton had to be called off, their largest printer was temporarily inoperative. Fast approaching our deadline of New Year and with everyone dispersing for the Christmas holidays that week, we needed to find a solution that would fit within our impending delivery date.
Fine-tuning the LED matrix
GL – During the initial design phase we decide what we wanted the LED matrix to display, and what necessary information would be needed to send to the Arduino. This was my first large Arduino project, and I was under the illusion that any LED matrix would be compatible. I thought all we had to do was connect the Arduino, and away we go! What I didn’t take into consideration was that the Bluetooth shield we were using (despite sitting on top of the Arduino) actually needed to have access to some pins. Rookie mistake!
After everything was connected, we could see the Bluetooth device on the IoT core device – unfortunately, whenever the Arduino tried to update the matrix with some text, the Bluetooth connection would drop. Explaining it now, it kind of makes sense, however being a rookie this was a bit of a nightmare to figure out. After talking to some people on forums and discussing with members of both the Arduino forums and the Adafruit forums we managed to pinpoint the problem. The Arduino was two pins short of being able to deliver the UI we wanted.
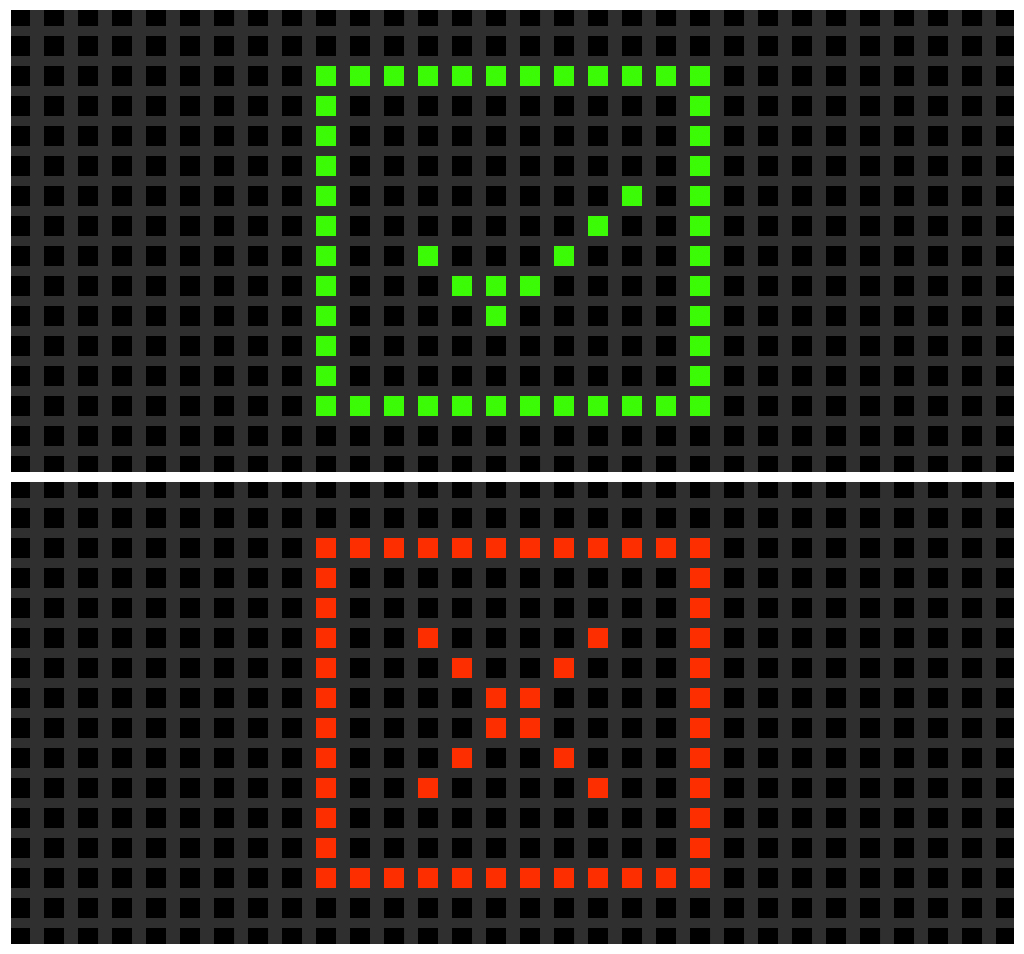
This was due the LED matrix being made up of two lines for writable text, this would be controlled by 3 pins for the top, 1 pin for each R,G,B and the same for the bottom line. Two of the pins we needed in the bottom line were being used by the Bluetooth shield, so we could have full colour on the top line and only red on the bottom – after looking at our original designs is fairly close to what we wanted, we could make this work!
Into the home straight
Having come to the end of Part 2 we’ve built upon the technical approach with development time going into Windows IoT core, creating a Bluetooth profile and setting up the sharing of calendar data.
Closing points on Alexa and Arduino
Giulio Ladu – When initially deciding on the best route to take in making this all possible, we choose to host our own web service. This was partly for fun, and to try something different – but also for practical reasons. Hosting our own service provides us with the opportunity to add extra functionality at any time in the future, with minimal disruptions to any current working skills. It is also gives us an insight into how the Alexa service interacts with a server.
We took the scenic route to get to this stage, but we now have Alexa talking to our web server, which in turn can call a web API and get a list of meetings between two given times. This can be formatted and passed back to Alexa to form a response, and passed over to the Arduino to update a screen.
There was one last issue I found with this set up – the screen needed constant updates from the server to let the Arduino know if a meeting had finished, or if another meeting had started. We opted for the server to send data over to the Arduino every minute as this would also allow us to have a timer displayed on the LED matrix.
This was an incredibly interesting experimental project, and was a great chance to use a myriad of technology and solutions to provide the finished result. While we were working our way through the dev work, Adam was still tinkering away with the designs to create something awesome to house and highlight the finished product.
Updating the model and getting it printed
Adam Thoms – Back on the internet, we searched through the options available to us. Via a website called 3DHubs we managed to find Alkaios; a student studying for his PhD in Additive Manufacturing and owner of a 3D printer. Generously he looked over our digital 3D model and gave us some excellent advice.
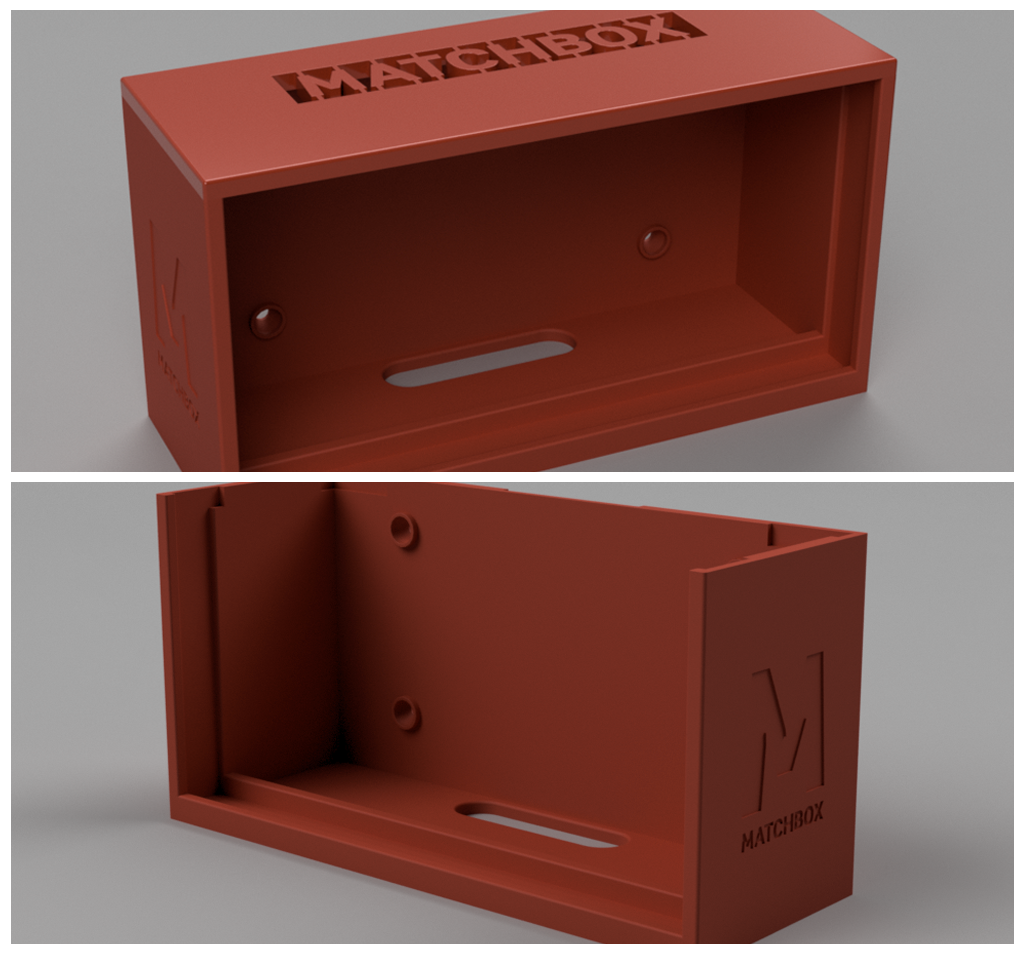
We took his feedback on-board and streamlined the model with a version 2.0. Originally we planned to print the base in two parts, (as it exceeded the 200mm limit most 3D printers have), the design utilised extruded ‘pins’ to clip back together.
Alkaios informed us how this would likely cause problems with the print. Rearchitecting the box so everything fell within the interior, such as the wall mounted clasps, we managed to get the length under 200mm while still having space for the long LED board.
Additionally, gone was the cylindrical hinge, in favour of a much more refined and print-efficient ‘plug’ shape to keep the lid securely in place.
Alkaios prepared his machine to print our new model. He started with the lid, the first of two items that made up the box. All went well, we received a photo of our newly created ABS plastic lid (and apparently it only took 4 hours!)
Sadly, the good luck wasn’t to last, part two was the much bigger bottom item. Due to the large size of the box, specifically the amount of space it takes up on the bed, as the printer layered up the model’s height it was cooling down at different rates, creating a warping effect in the structure.
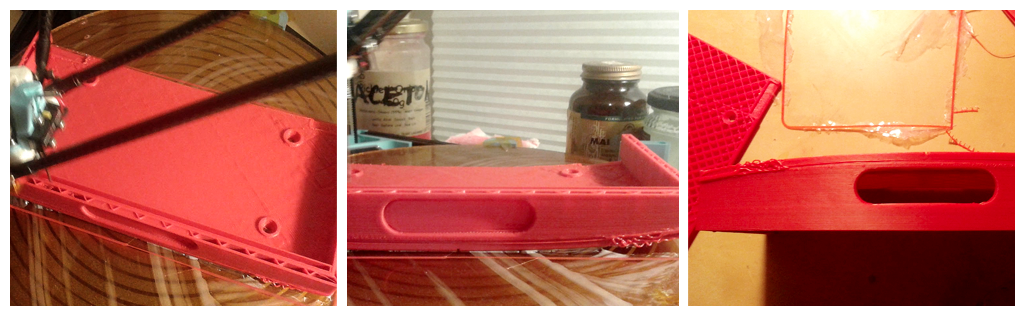
After a couple more attempts of failed prints, there was one more option left. Hitherto we had been attempting to print with a plastic filament called ABS, we decided to try another called PLA, boasting a better reputation with cooling rate consistency. The change in material worked out and Alkaios was able to successfully print the model!
For version 2.0
GL – After playing and testing the system, it seems to work well, as long as a meeting is added to the shared calendar Alexa can tell you who is in the meeting room and how long the meeting will last. However, if we have the opportunity to work on a v2 of this project there are a few change/upgrades which I believe would make it more effective.
Upgrading Alexa Skills: First I think it would be great to add more functionality to the Alexa skill, one major feature I would have liked to add was the ability to book the room via voice commands. This would allow Alexa to update the offices shared calendar, simply by giving a name and an amount of time.
Upgrading the Hardware: I also think there is room to improve the hardware used too. I think if we added two small laser tripwires to each side of the meeting room door we would be able to count how many people are in the room.
We would then be able to check every time a meeting is supposed to finish how many people are still in the room. If there are people still in there we would be able to update the LED screen with something like “MEETING OVERUN” and would be able to update the shared calendar.
Finishing Touches
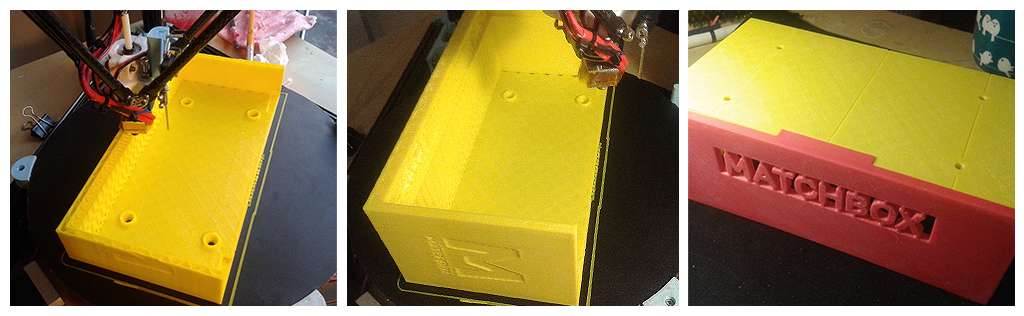
AT – Looking at the newly printed box, resplendent in its roughly hewn yellow plastic form, I was tempted to call it finished and wrap up the project. Perhaps ironically, due to the warts and all nature of 3D Printing, this did grant it a certain handcrafted charm. But being a Graphic Designer at heart, working for a company with clear branding and consist internal/external documentation, there was one last step.
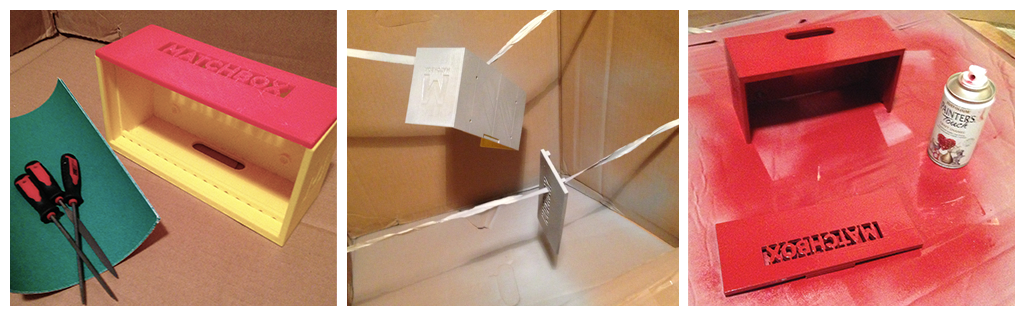
To finish, I filed and sanded any excess material off the model. Once this was done, it had a coat of primer, followed by several layers of spray paint in a somewhat familiar red colour! Once dry, we took Giulio’s hardware setup and placed it inside the box.
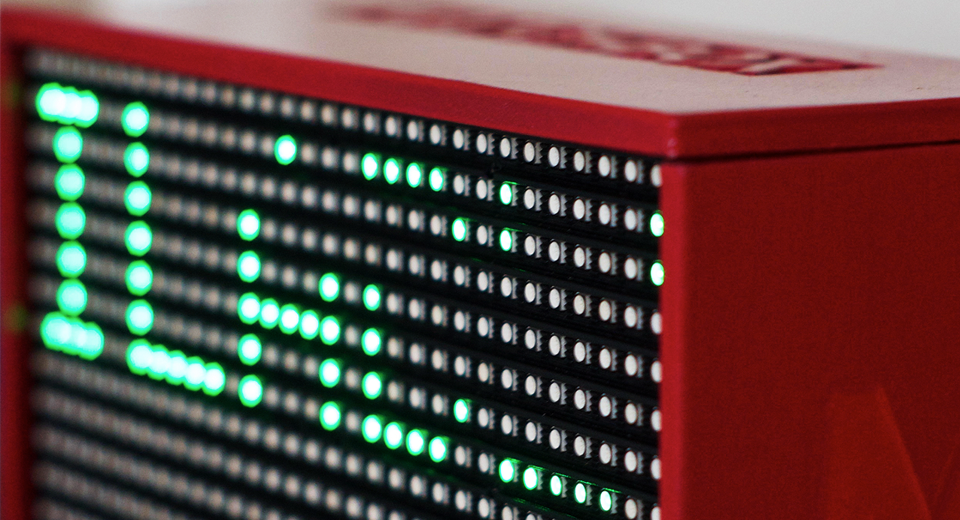
It’s a wrap!
Now we’ve got Alexa introduced to the rest of the office and our little LED matrix displaying calendar information, we’re eager to see how it all works out.

